- Products
- Solutions
- Services
- Resources
- Customer Success
- Company
- Sign In
- Contact Us
So you have already an app idea running in your mind and you are now ready to turn this idea into reality and bring it to the market afterward. If so, there is no doubt that you are eager to start getting your very first reviews, downloads, and profits. However, the big problem is that you don’t have any idea where to begin.
As a matter of fact, programming or coding is extremely tough on its own, but Android application development is even more complicated than what you are thinking. Why? Simply because you don’t only need to understand Java, but you are also required to download and install various software even though you are only developing a very simple and basic project. Not only that, you should also learn and familiarize anything regarding Android application development.
As a general rule, Android application development requires Software Development Kit (SDK), an Integrated Development Environment (IDE) such as Eclipse or Android Studio, JDK (Java Software Development Kit) as well as a virtual device where you can test your app. These things must be set up first before you can run your app or started looking into things such as API levels, screen sizes, and Google Play services.
Nevertheless, the main purpose why we have created this comprehensive guide is that to help you create an Android app with ease. And our goal on the other hand that at the end of this article you will be able to create your own Android app.
So are you ready to create your first app? If so, then let’s get started, however, this may take a while.
Nevertheless, let’s begin this content by listing that things that you need to know before developing your first app.
Things That You Must Know Before Starting Android App Development
There you have it, the things that you need to know before developing an app, either way, let us now begin the Android app development process.
How to Download Android Studio
As what we have mentioned a while ago, in order to begin the Android application development process, you need a certain software known as IDE. However, the most common used IDE for Android app development is the Android Studio.
The Android Studio, on the other hand, can be downloaded, but make sure that when downloading, it is compatible with your computer. In fact, you can download Android Studio here.
Furthermore, IDE is very important, because it provides the main user interface where you can start coding your app. Not only that, it also indicates some errors or things that you get wrong and allows you test and run your app conveniently. In addition, it makes files that you will be needing in the Android app development process and offers basic layouts. In other words, IDE saves you lots of your effort and time as well.
However, if you download this software, you can also get other software like the Android Virtual Device an emulator where you can run and test your app and the Android SDK. Furthermore, if you are installing the software, make sure to leave the boxes marked so that you will be able to add the mentioned components. Though you can still add them manually afterward, though it will become more complicated.
Nevertheless, there are some alternatives to Android Studio as what we have mentioned above like Eclipse. It is an old version IDE that can also be used in developing an iOS app and overall, Eclipse is a bit supple. Another option is the Basic4Android, an IDE that allows you to code an Android app using the basic programming language.
Either way, assuming that you have already installed and downloaded the Android Studio, don’t run it yet without following the next step which is to set up your IDE.
How to Setup the Android Studio
If you are reading this section, perhaps you have already downloaded and installed Android Studio and the good thing is you are already one step closer to becoming an Android app developer.
However, before you can start coding you need also to install Java on your computer for you to use the Android Studio. Definitely, you need to download and install the JDK or Java Development Kit. Actually, Java is the programming language you are going to utilize to develop your app that is why JDK is very important. Nevertheless, downloading a JDK is very easy and you can download it here.
Once you have successfully downloaded and installed the JDK, you can now launch your Android Studio and a menu will be presented to you. In this menu, you will be able to configure various options. Even so, the good thing is that during this time, everything is controlled for you. But if you want to become familiar with the SDK Manager well, you are still allowed to do so. And you can check it by clicking the Configure tab and then SDK Manager.
Nevertheless, once you have downloaded, installed, and set up all the needed software, then you are now ready to create your first project.
How to Start an Android Project
In this section, we will show you how to start a new project using Android Studio.
Let’s get started.
Step 1. Click the Start a new Android Studio Project on the welcome screen. But if you have a project opened, click File followed by New Project
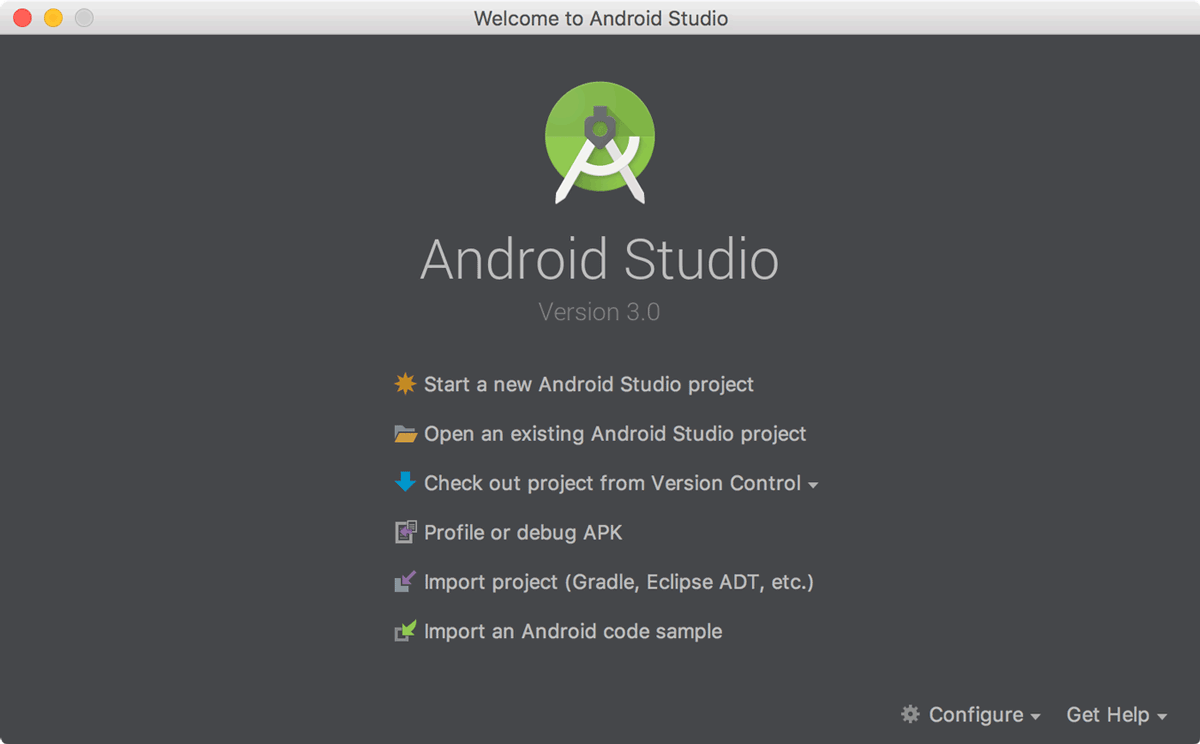
Note: This interface will pop up once you launch your Android Studio.
Step 2. Enter the succeeding values in the Create New Project box. For example
However, if you want to change the project location, then you can still change it on your own preference. In addition, if you want to create a Kotlin application, make sure to check the checkbox labeled with Include Kotlin Support then leave the additional options as they are.
Step 3. Click Next
Step 4. Keep the values by default in the Target Android Devices then click Next
Step 5. On the Add an Activity to Mobile window, choose Empty Activity and then click Next
Step 6. Afterward, click the Finish Button, by leaving the values by default in the Configure Activity.
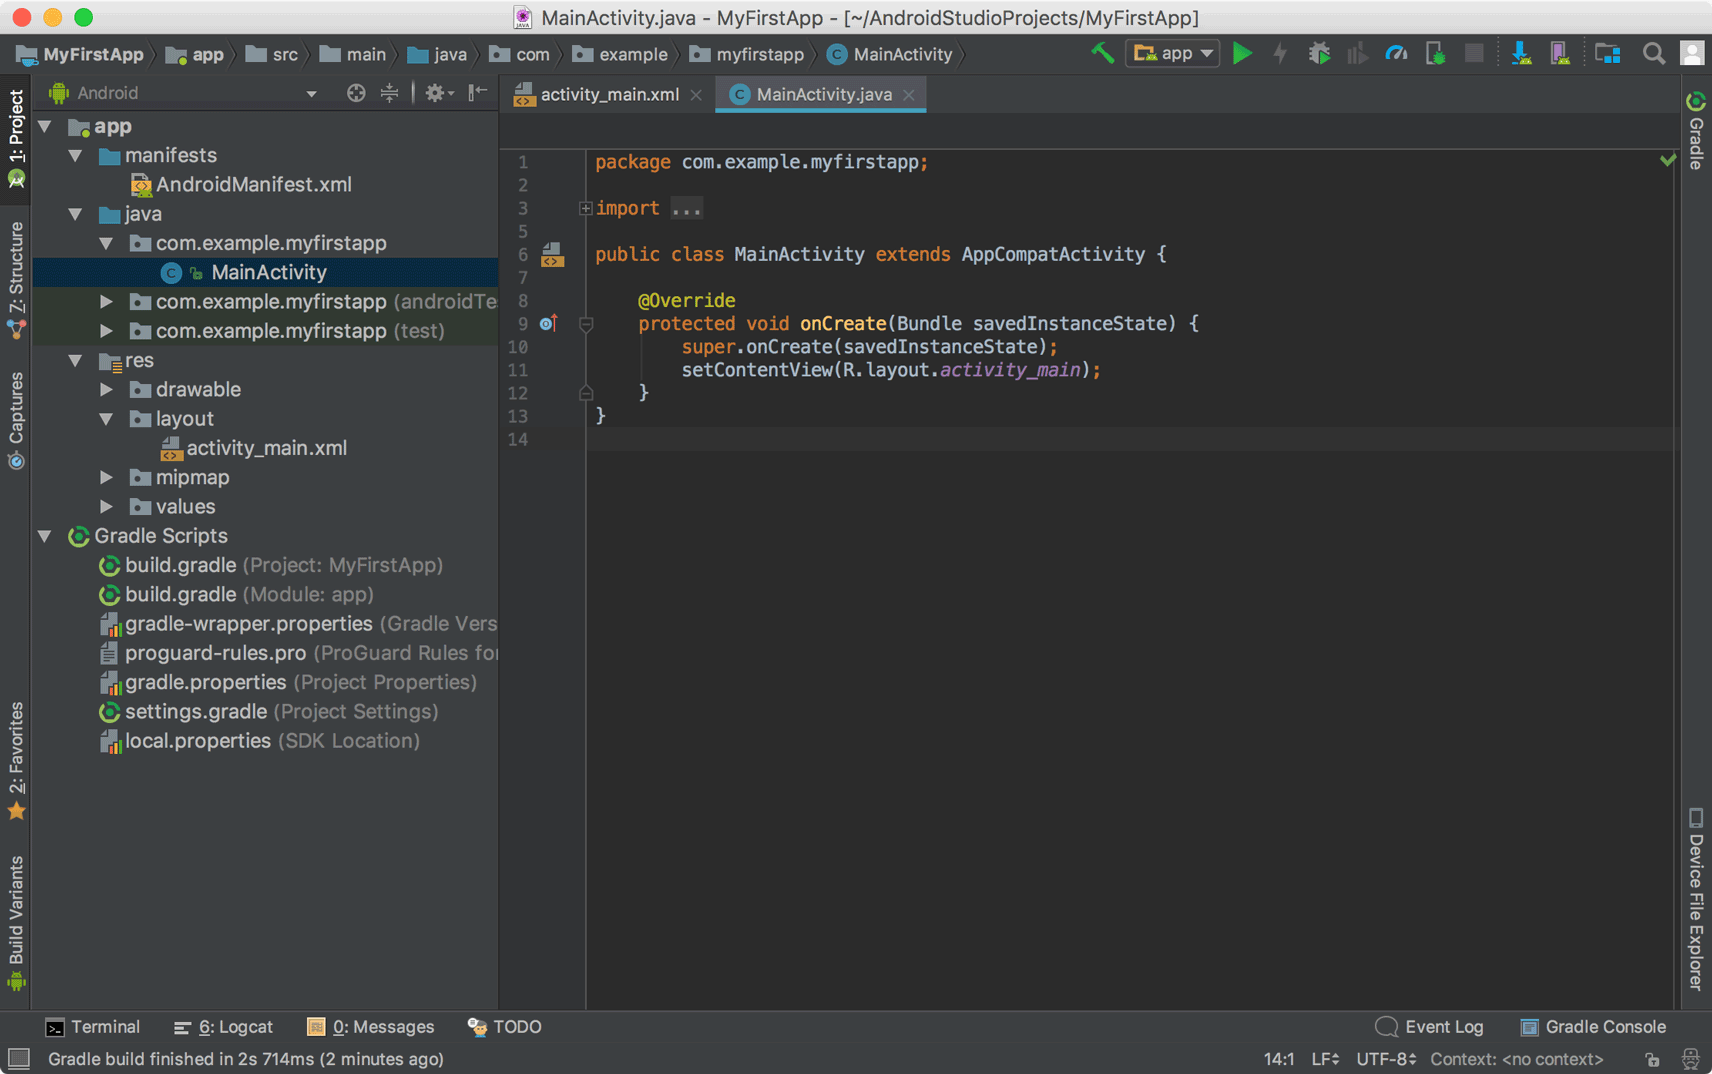
Note: Once you have completed the six steps mentioned above, you Android Studio screen will also look like in the image above.
However, if you some extra time review the important files that you have seen on the left side of your screen.
First and foremost, make sure that your Project window is already open, if not, go to View, then Tool Windows, and look for Project. On the other hand, make sure that the selected view from the drop-down list is Android, however, this list is located at the top of your window. Afterward, you see the flowing files listed above.
How to Run Your Android App
In the preceding lesson, you have created your Android project, however, in this section, we will teach how you how to run your app on an emulator or real device.
Step 1. In your Android Studio, go to the App module in your Project screen and then click Run, though you have another option, click (Run) which is located in your toolbar.
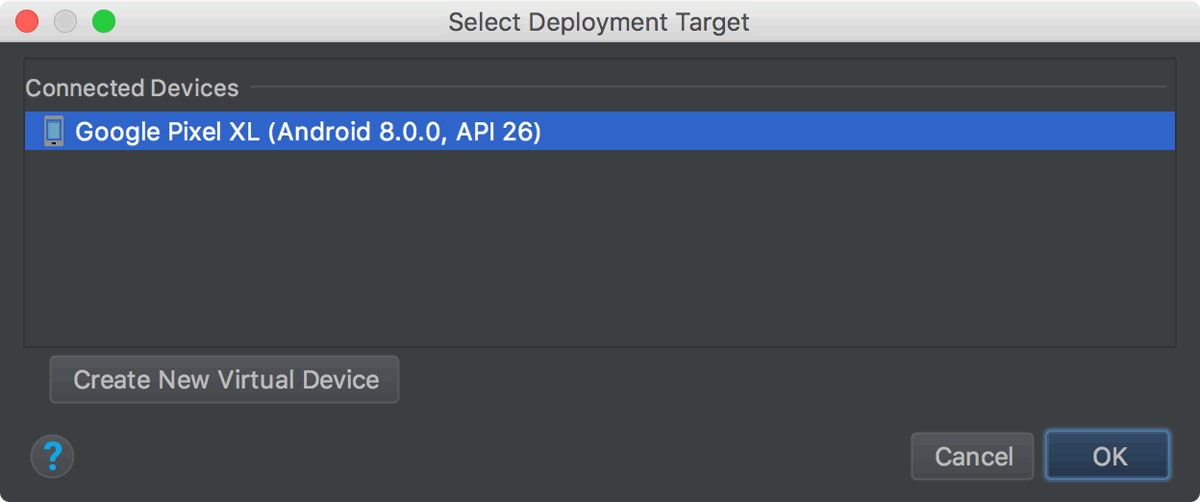
Step 2. In the Android Studio’s Select Deployment Target screen, click the Create New Virtual Device
Step 3. Afterward, in the Select Hardware window, choose an Android phone device, for example, Pixel and then press the Next button
Step 4. After selecting the phone device, choose the version that has the maximum API level in the System Image window. But if you did not download any version yet, you don’t have to stress yourself, because you can see a Download link. You can use this link the API level that you need. Either way, click the link to start the downloading process.
Step 5. Click Next
Step 6. On the AVD or Android Virtual Device screen, leave the settings by default and then click Finish
Step 7. Once you have clicked the Finish button, you will be redirected to the Select Deployment Target window, then choose the device that you have created and click OK.
However, the Android Studio will install your app on the emulator and runs it. For example, in your code, you want to display “Hello World” in the app. Well if you run your app, you will be able to see this phrase on the emulator unless your code doesn’t have any error.
Step 1. Connect any of your device (smartphone or table) to the machine you are using in the Android application development process by means of a USB cable. Even so, if you are developing on Windows, you are required to install the right USB driver for your device.
Step 2. After connecting your device, in the Developer options, enable or click USB Debugging by following these instructions, but before anything else enable your Developer options.
After which, launch Developer option, then enable and find USB debugging by scrolling down your device.
How to Create a Simple User Interface
In this section, we will be using the Android Studio Layout Editor to make a layout that consists of a button and text box.
In order to get started, make sure to set up your workspace by following the instructions below.
Step 1. In your Android Studio’s Project window, click app > res > activity_main.xml
Step 2. Hide your Project window, to make a space for your Layout Editor. You can hide the window by clicking View, after which look for Tool Windows, and then Project or click found beside Project.
Step 3. However, if your layout editor displays an XML source, you need to click the Design tab found at the bottom part of your window.
Step 4. Click or Select Design Surface, then choose Blueprint
Step 5. After which, in the Layout Editor’s toolbar click Show, and ensure that the Show Constraints is ticked.
Step 6. Also, make sure that you have turned off the Autoconnect.
Step 7. Upon verifying that auto connect is turned off, in the toolbar, click Default Margins and then choose 16, though you can still adjust the margins later on.
Step 7. Again, in the Layout Editor’s toolbar, hit or Device in Editor then choose 5.5, 1400 x 2560, 560dpi (Pixel XL) for example. However, the device size will depend on the size of the phone where you want to run and test your app.
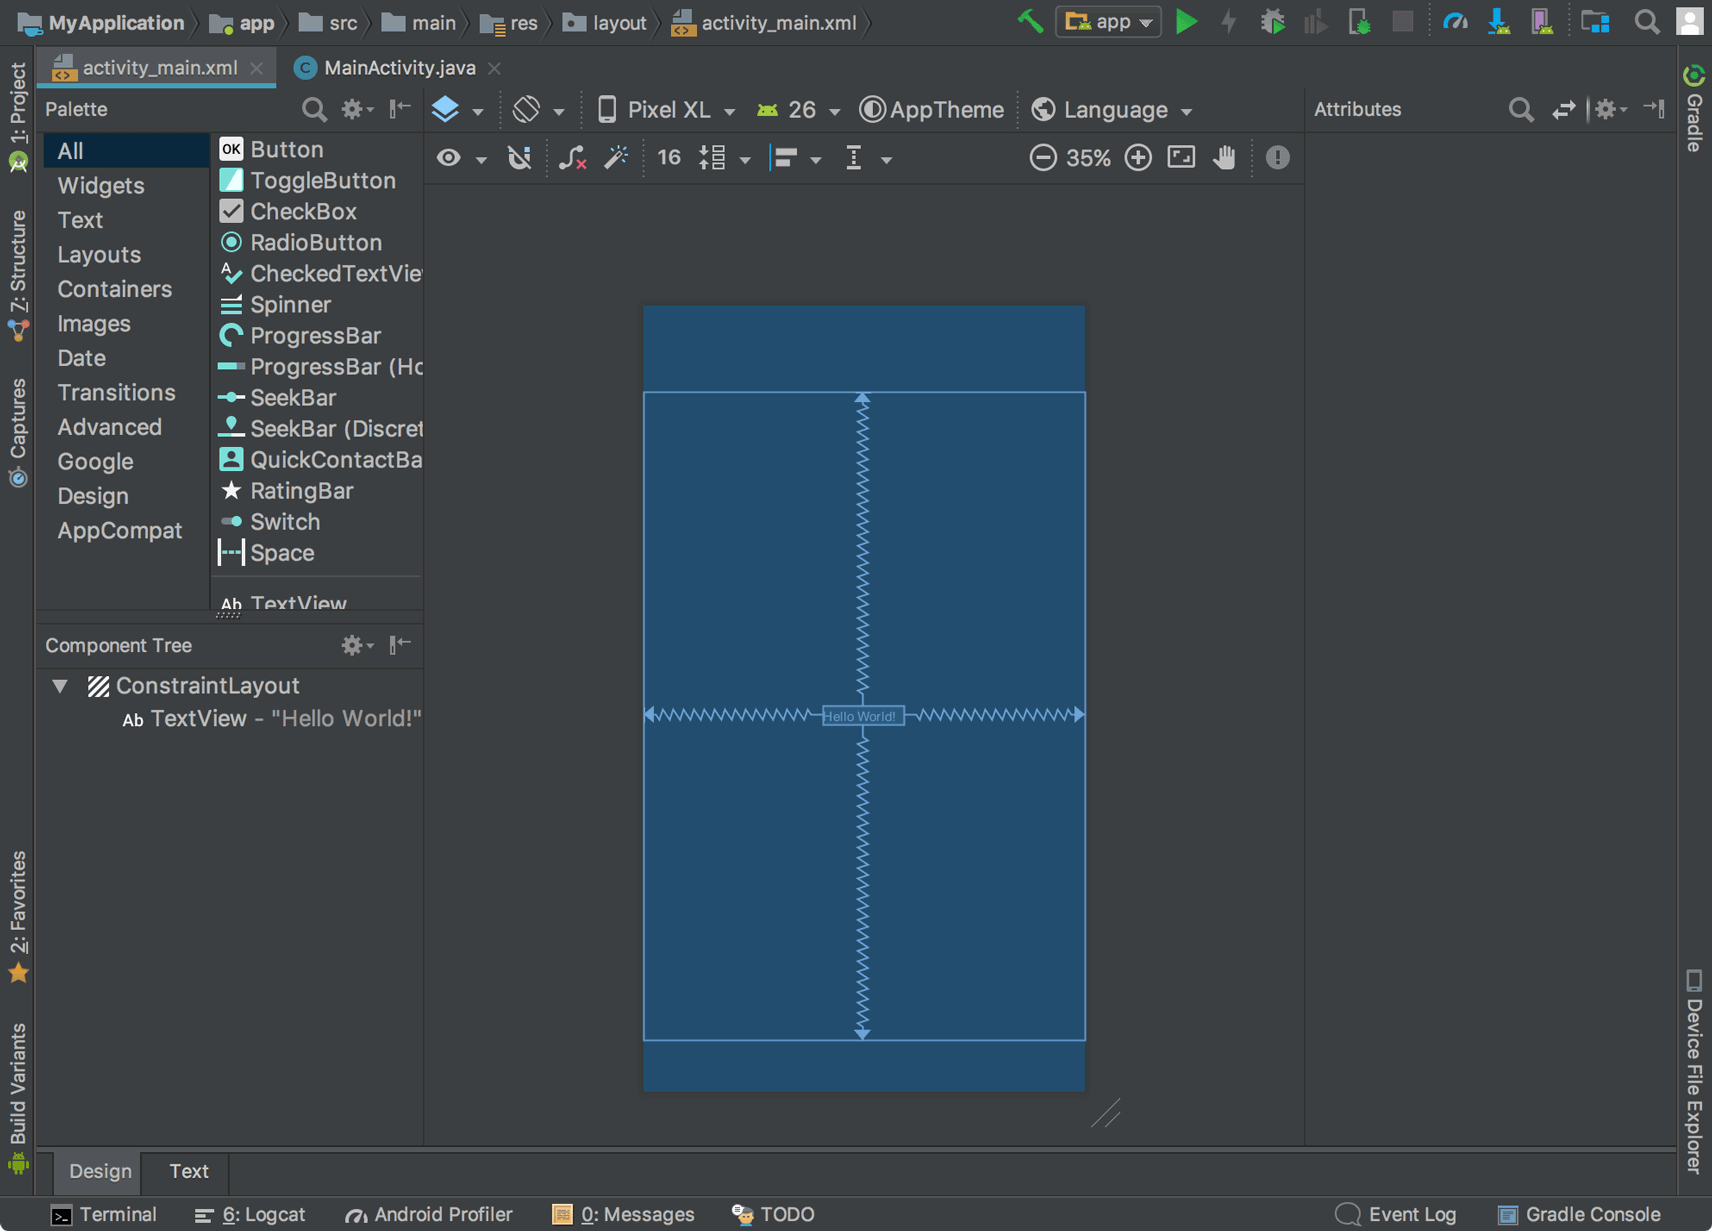
Note: After doing the instructions, your Layout Editor will look like the image above.
How to Add a TextBox
First Step. Get rid of what is already in your layout. In the Component Tree box, select TextView then click Delete
Second step. Click Text in the Palette to show the text controls that are available.
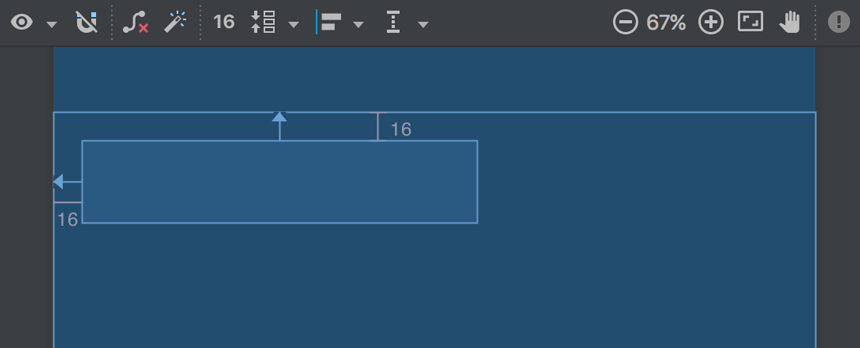
Third Step. In your design editor drag a Plain Text and drop it on your layout, you can drop it whenever you want but we recommend that it is better to place the Plain Text on top of your layout. (Plain Text – a widget (EditText) that accepts simple text input)
Fourth Step. In your design editor, click View, to see the constraint anchors (circles) on every side as well as resizing handles (square) on every corner.
Fifth Step. Resize the text box depending on your own preference.
Either way, the finished product will look like this:
How to Add a Button
First Step. Click Widgets in the Palette
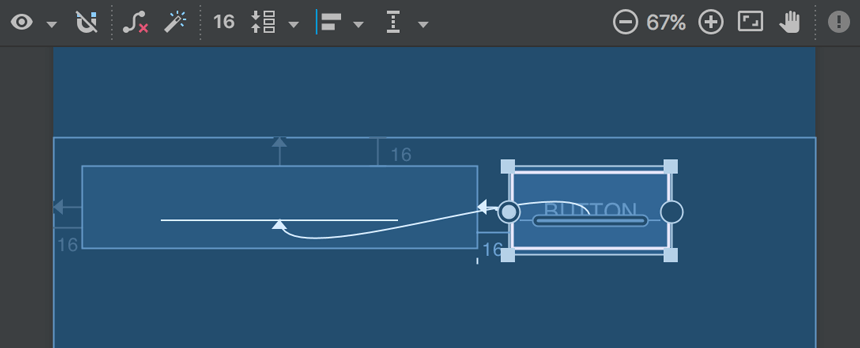
Second Step. Drag a Button into your design editor, then drop it to the right side of the Plain Text that you added a while ago.
Third Step. Make a constraint
Fourth Step. For you to make constraint in a particular view in a parallel alignment, make sure to make a constraint between the baselines of the text. How? Click the button, and then click or Edit Baseline. After which, the anchor baseline will appear inside your button. Then click and hold the anchor, then drag it to the anchor baseline found inside the textbox.
Nevertheless, the finished product will look like this:
How to Change the User Interface (UI) Strings
In order to preview the user interface, in the toolbar click or Select Design Surface and then select Design.
You will notice that the Plain Text you placed a while ago is pre-filled with “Name” while the button is labeled with “Button”. However, you can change their names and in this section, we will be tackling on how to rename a textbox and button properly.
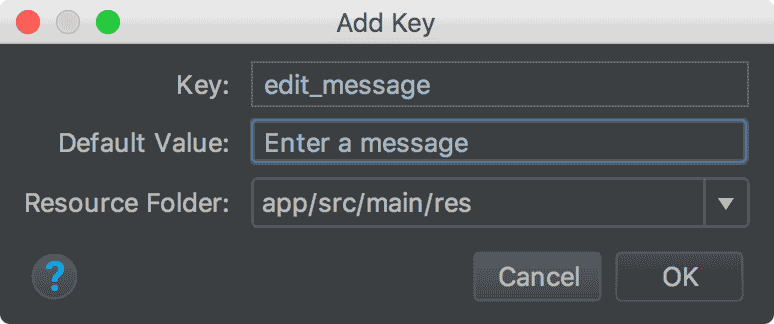
After which, you can now set the strings for every review. Go back the layout file by clicking the file named activity_main.xml found in the tab bar. On the other hand, you can now add the strings by following these steps.
Step 1. In the layout, click the textbox, however, if the Attributes screen is not yet visible, then make it visible by clicking Attributes that is found in the right sidebar.
Step 2. Look for the text property and remove the default value.
Step 3. Look for the hint property then choose Pick a Resource. After which, a dialog box will appear and then click the edit_message twice from the list.
Step 4. In the layout, click the button, look for the text property then click the Pick a resource and then choose button_send.
How to Run and Test Your Android Application
If you have already installed your app your device from the previous lessons, just simply click or Apply Changes in the toolbar, so that you will be able to update your Android app with the new layout you have made. Better yet, click or Run to install as well as run your app.
How to Publish Your Android Application
Publishing is the process that makes your Android app accessible to people. However, publishing involves two tasks.
In this section, we will show you an outline of the Android app development process that you need to follow as you prepare and publish your App.
How to Prepare your Android Application for Release
Preparing your Android app for release requires lots of processes and here are the following.
If you are planning to release your Android app, you need to eliminate the android:versionName and android:versionCode as well as Log Calls that can be found in the <manifest> file. You also need to configure other settings so that you will be able to meet the requirements set by Google Play. However, if you’re using Gradle files, you can make use of the build type release.
You can use the Gradle build files along with the release build type to sign and build a release version of your Android app.
Before you can distribute you need to perform a thorough and comprehensive test of your app’s release version on one tablet device and one phone device as well.
Before releasing your app, make sure that all your app’s resources such as graphics and multimedia files are updated and incorporated into your Android app or presented on the appropriate production servers.
If your app depends on external services or servers, make sure that they are production ready and secure.
Aside from the processes mentioned above, you may possibly perform other tasks. For instance, for you to sign your Android application you need to have a private key. Also, you will need to create an icon for your app. Most importantly, if you want to protect your intellectual property, person, and organization you need to prepare EULA or End User License Agreement.
Nevertheless, once you have prepared your app for release, you will receive a signed .apk file that you can issue to people.
Either way, here’s how to release your app to millions of users.
How to Release your Android Application
Actually, you can release your app in several ways. Commonly, you can release your application through marketplaces like Google Play Store, however, you can also release an app on your site or by directly sending your app to the users. But in this article, we will only discuss on how to publish your Android app in the Google Play Store.
Google Play Store: How to Release your Android App
As we all know, Google Play Store is a popular and vigorous publishing platform that aids you in distributing, selling, and publicizing your app all over the world. On the other hand, if you release your app on the said platform, you have the authority to access set of Android app development tools that you can use to identify the market trends, evaluate your sales, and revenue-increasing features like application licensing and in-app billing.
Even so, releasing your Android app in the Play Store is very simple and it only consists of three basic steps.
Step 1. Prepare your Promotional Materials
For you to pull the publicity and marketing capabilities of Play Store, you need to make several advertising materials for your apps like promotional text, graphics, videos, and screenshots.
Step 2. Configure options as well as uploading properties
Google Play Store allows you to distribute your Android app in several devices and users. However, by simply configuring some settings of Google Play Store, you will be able to choose the states you’re planning to reach, the fee you want to charge, and listing languages. Furthermore, you can configure other listing details including, content rating, application, type, and category.
Nevertheless, if you have already configured the options, you can now upload your promotional medium as well as your app as a draft application (unpublished)
Step 3. Publish your Android app’s release version
If you’re already satisfied with options that you have configured, you can now release your app to the public. By simply clicking Publish in the Play Console your app will be live and of course accessible for downloads in just a few minutes.
Conclusion:
There you have it, a comprehensive guide on how to make an Android app and how to upload it to Google Play Store. Nevertheless, we hope that this article will help you a lot and we are looking forward to seeing your Android app successfully published in Google Play Store.